New members of the Family!

One thing always leads to another, in this case it was a Dog lead……

We had always planned to get another Dog following the sad demise of Benita’s Bassett Hound “Sir Henry” a couple of years ago, it was just a question of choosing the right time.

Well, we were waiting in the garage for a small job to be done on Benita’s Audi TT back in January – to pass the time I picked up an 8 year old copy of “Pets Monthly” that was sitting in the pile of old magazines that you find in these places and started to read out the lead article on adopting a retired Greyhound.

Well after a few paragraphs it occurred to us that this could be the ideal dog, generally quiet (they don’t tend to bark), good natured, require surprisingly little exercise and as an added bonus, they sleep for most of the day. What better breed for 48 States of Grey!

After some thought, we visited the Greyhound Rescue centre in Surrey where a beautiful female introduced herself to us, after a short walk we decided that this would be our new Dog. A couple of weeks later, after the formalities had been completed, we collected “Ettie”. It was on the first day of lockdown; it was quiet on the roads………

“Ettie” the Greyhound – looking through the door.

As previously mentioned. we don’t now know when we will get to the States – probably once everyone has been vaccinated. Although still planning for this long term, we will probably do trips nearer to home next year, maybe Ireland, Scotland and maybe Europe. We have my Dad and friends who has offered to look after Ettie when we go to the States.

So it was not long before Benita suggested that Ettie might join us on the the more “local”trips. Initially, I was not convinced – there is not much room in a Land Rover for us and a reasonably large Greyhound. After some thought and knowing Benita’s penchant for a trailer, I suggested just that, as a solution………

My thoughts soon turned to a Military Trailer – a Penman would look good with the Perentie which already has a NATO Hitch…………A quick search turned up the usual rot boxes and some unused examples at the Military Auction houses. I didn’t want another project and knew that I would need to build some sort of weather proof structure over the trailer, if Ettie was going to sleep in there and we were going to use it to store extra gear (another advantage of a trailer, I have to admit).

Then on everyones favourite auction site, a converted Penman turned up. The seller had bought it new at auction, painted it grey (Perfect!), built a weather proof top, fitted some cool wheels, racked it out and put in electrics – as a bonus it had a Tuff-Trek roof tent…….A deal was done and the sellers, a lovely couple from South London offered to deliver it too us – by now we were reaching the end of lockdown and they were desperate for a trip to the coast – a Win/Win situation.

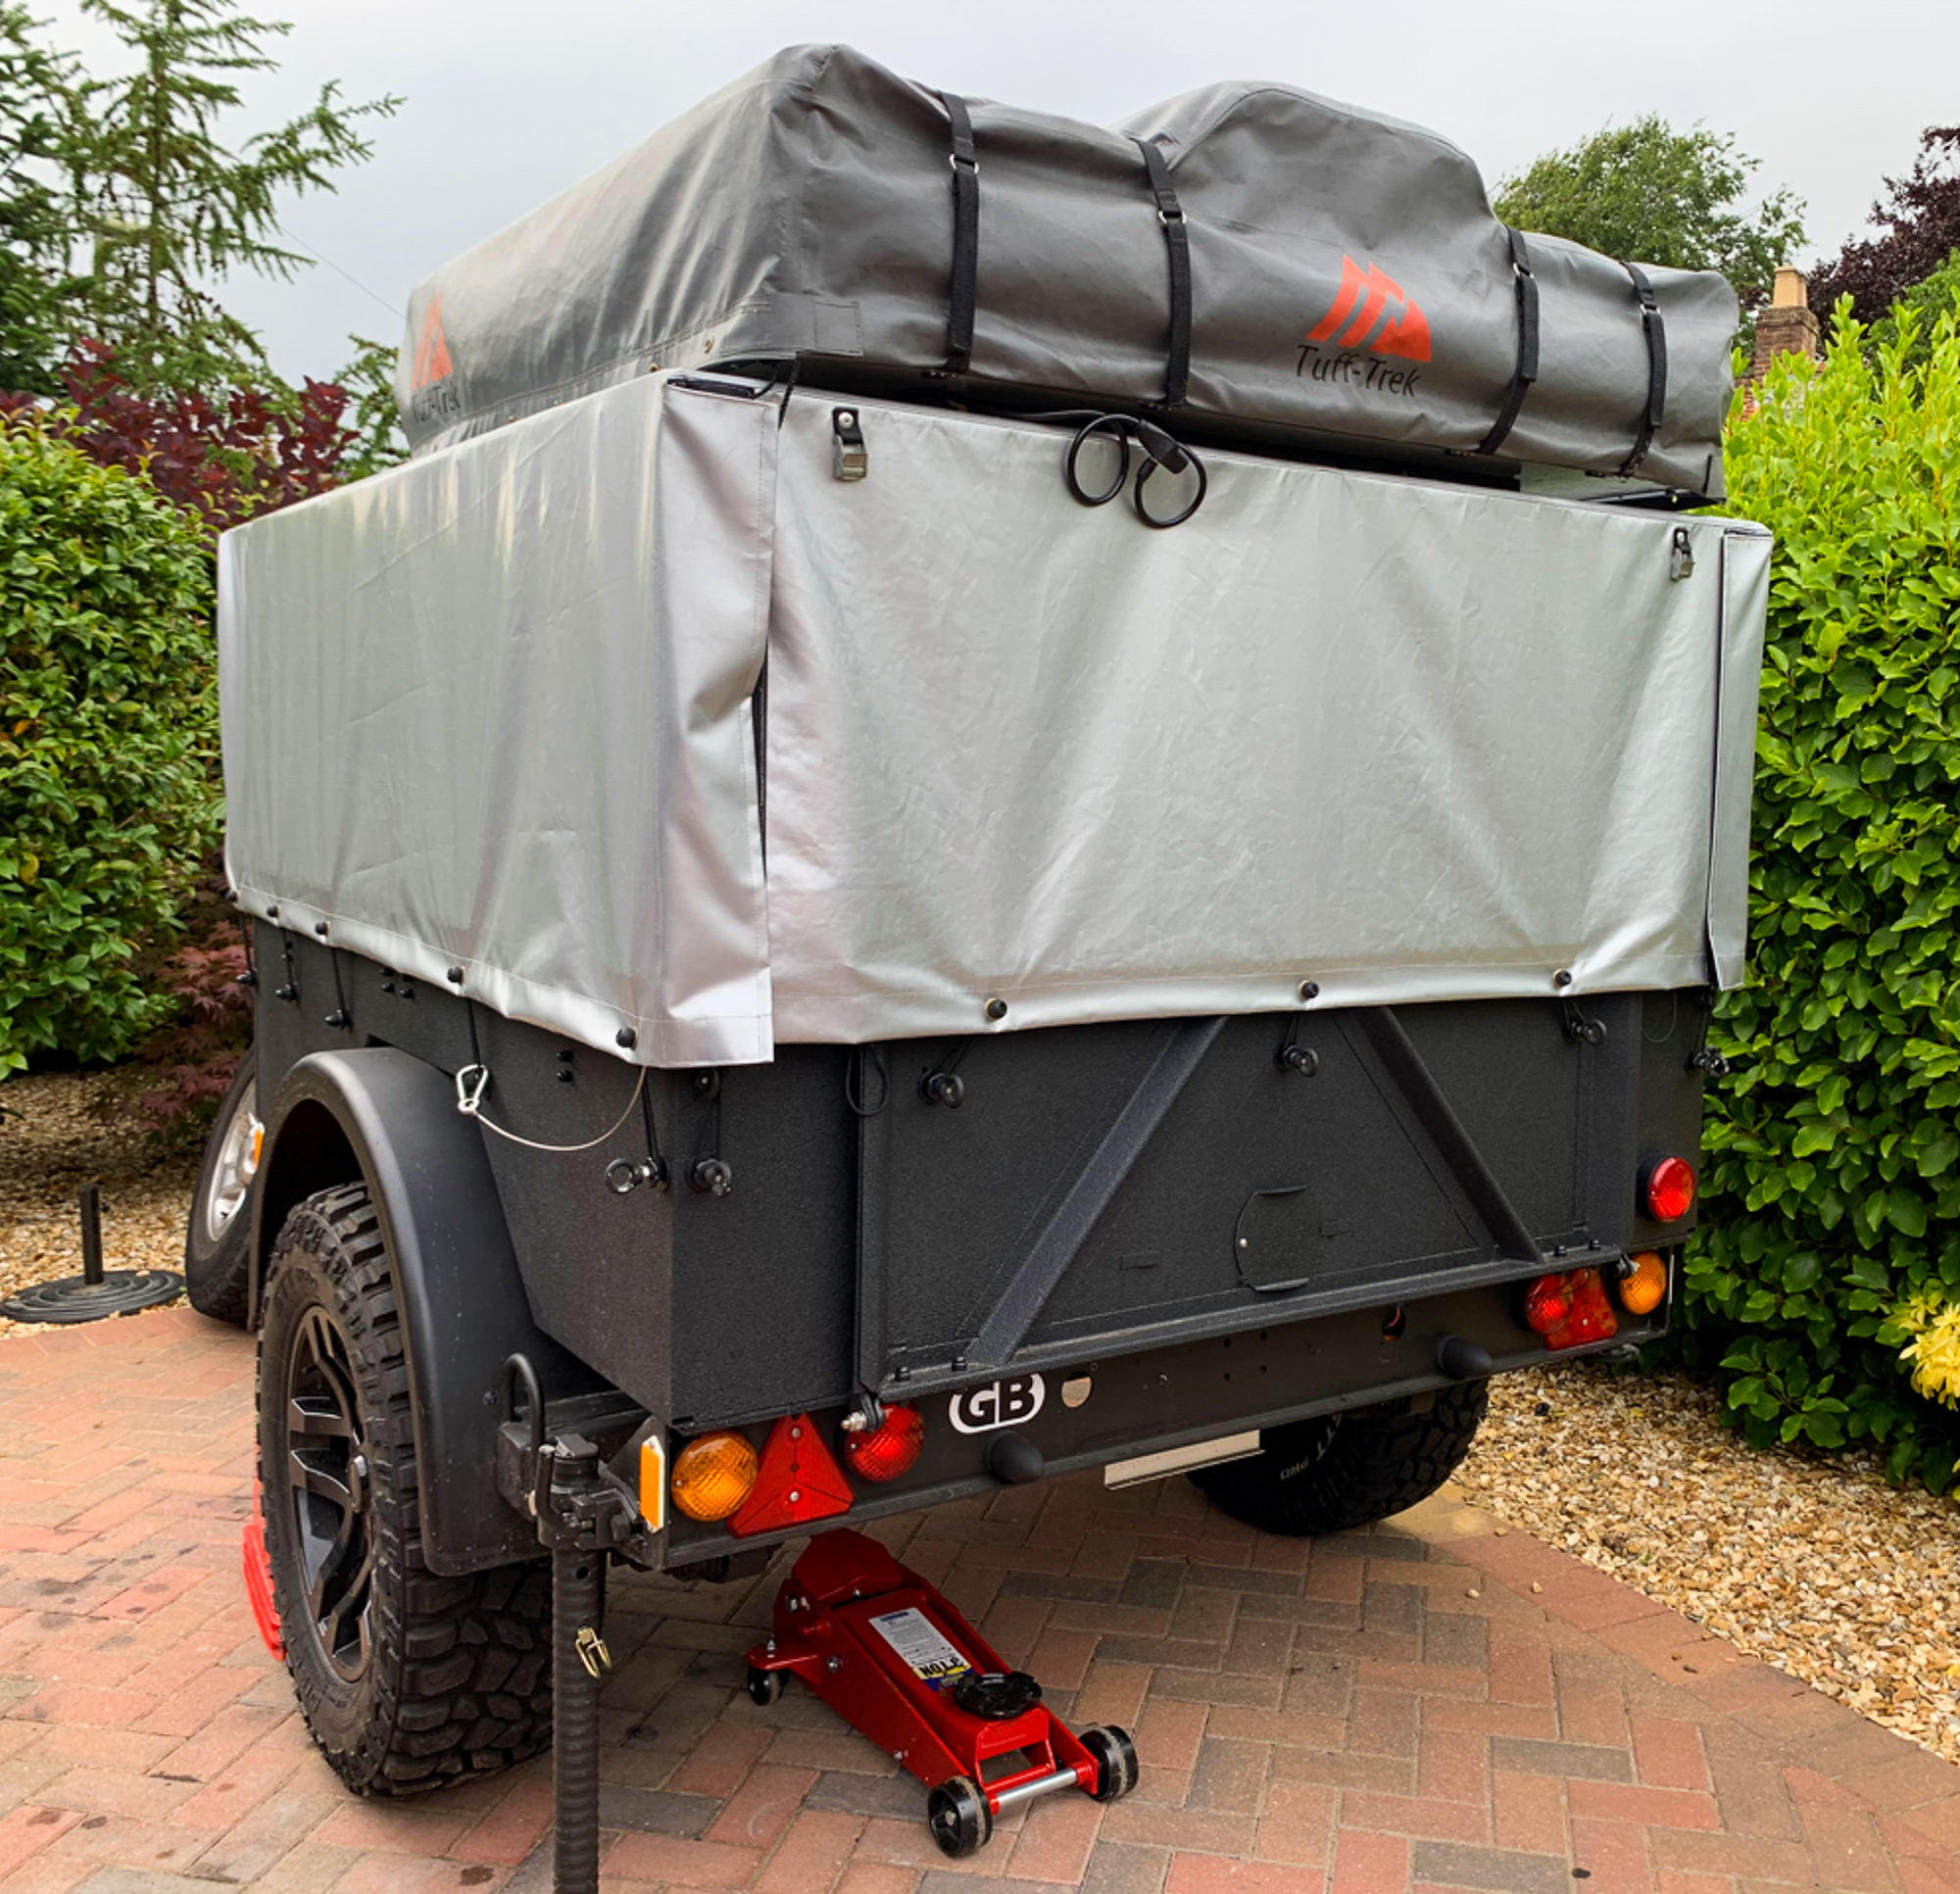
I must admit, it was a bit bigger than I thought it would be, but the build of the trailer itself is astounding which is not surprising as it was designed to be thrown out of aeroplanes, as was the Perentie.

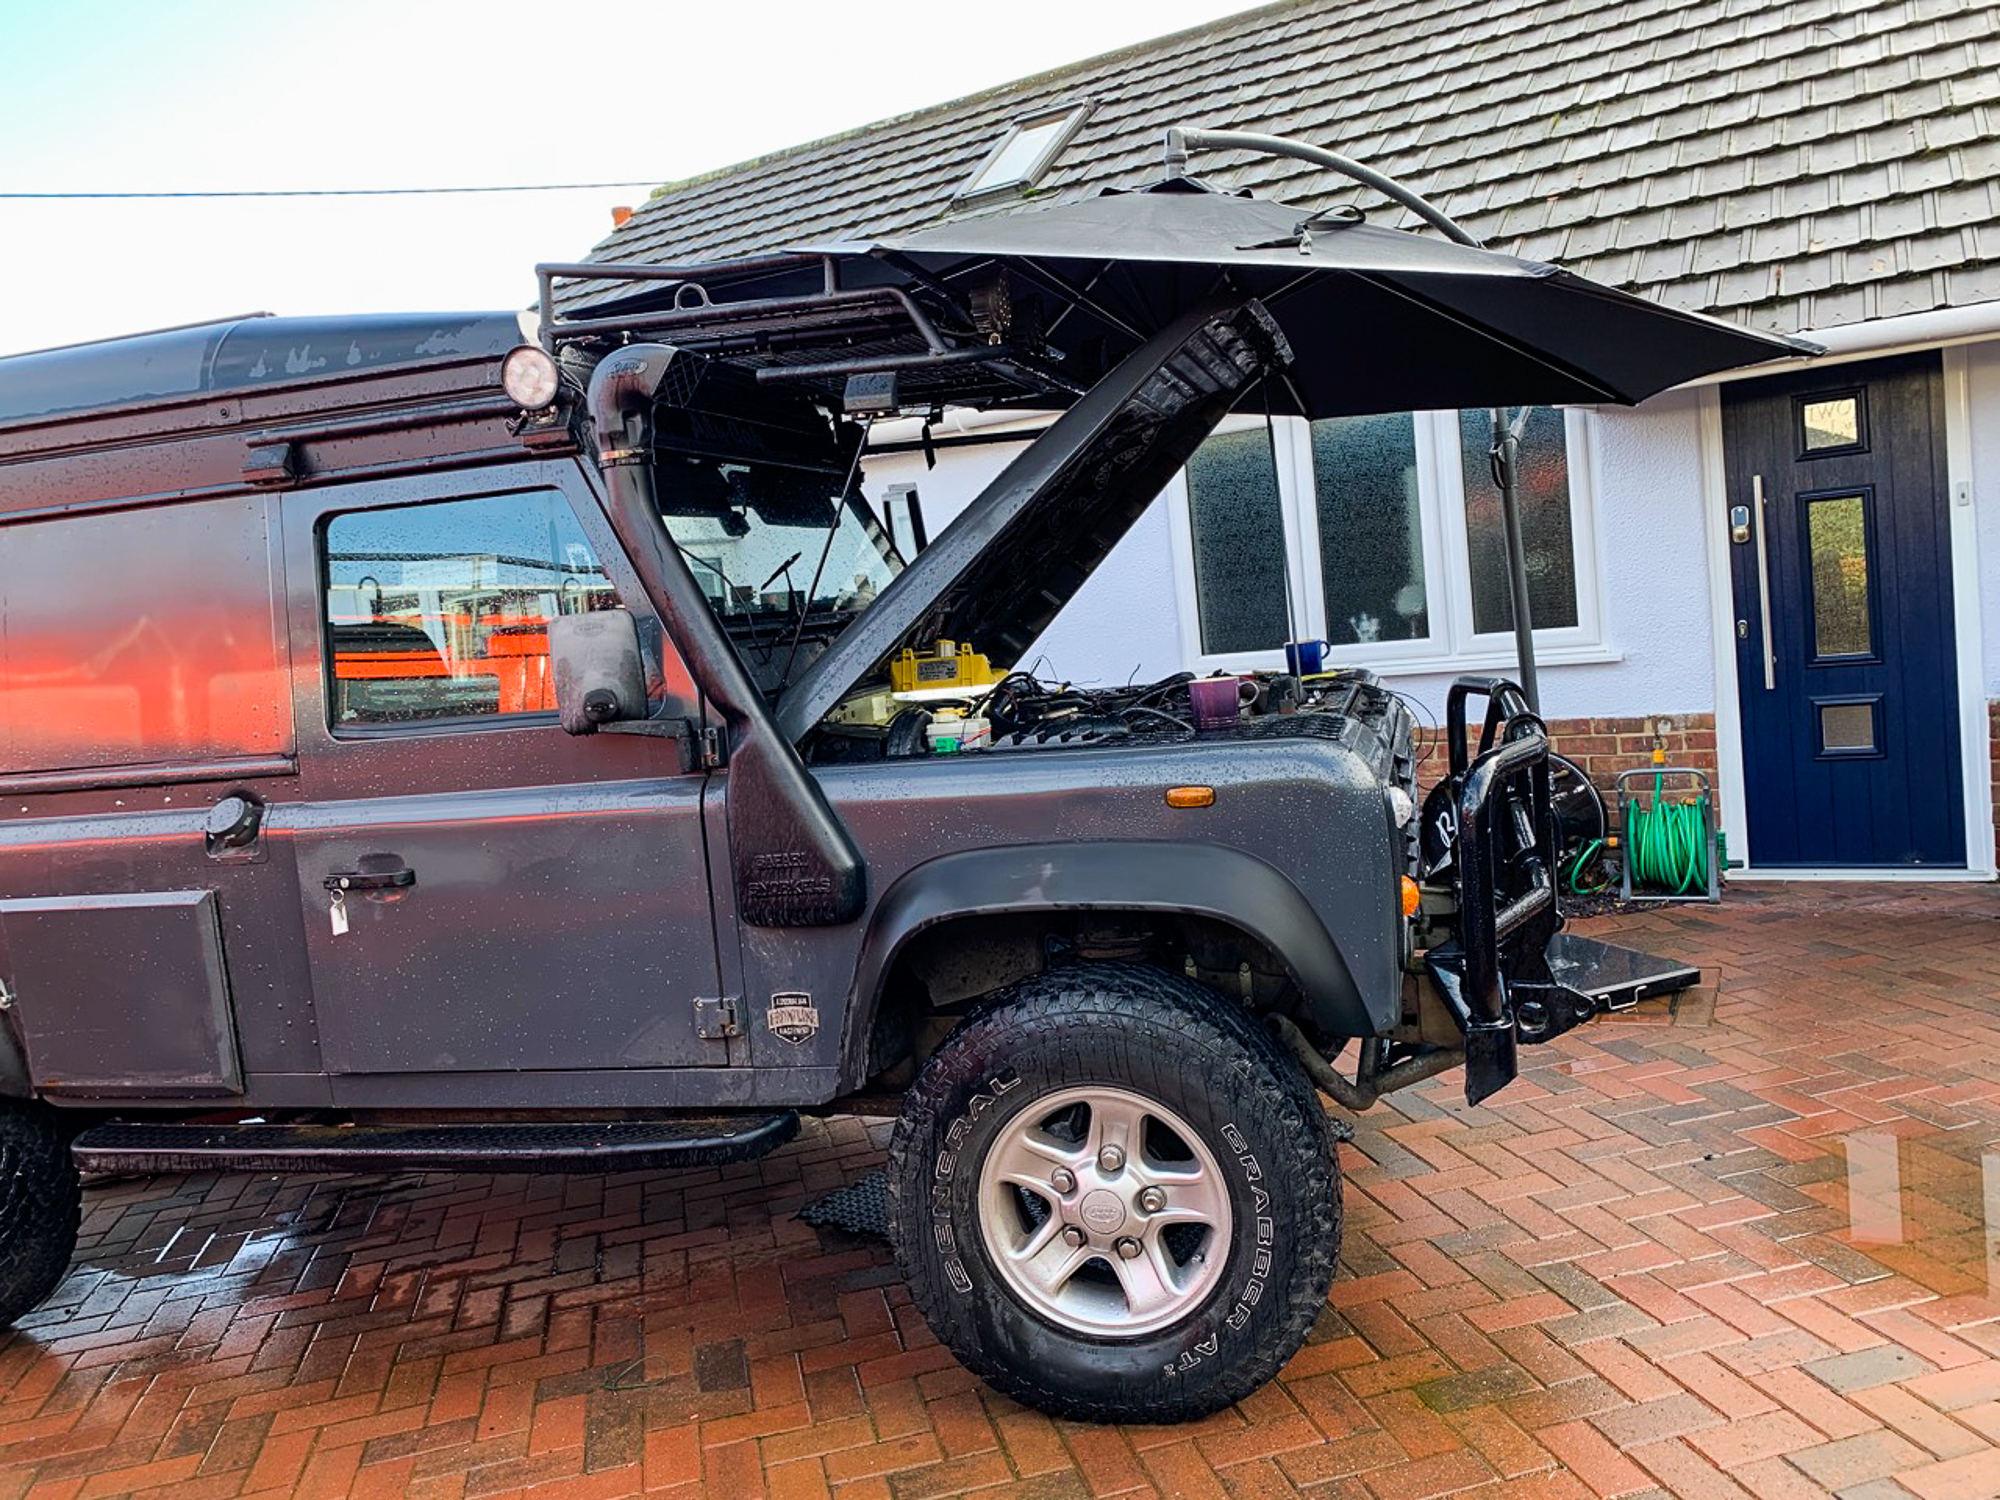
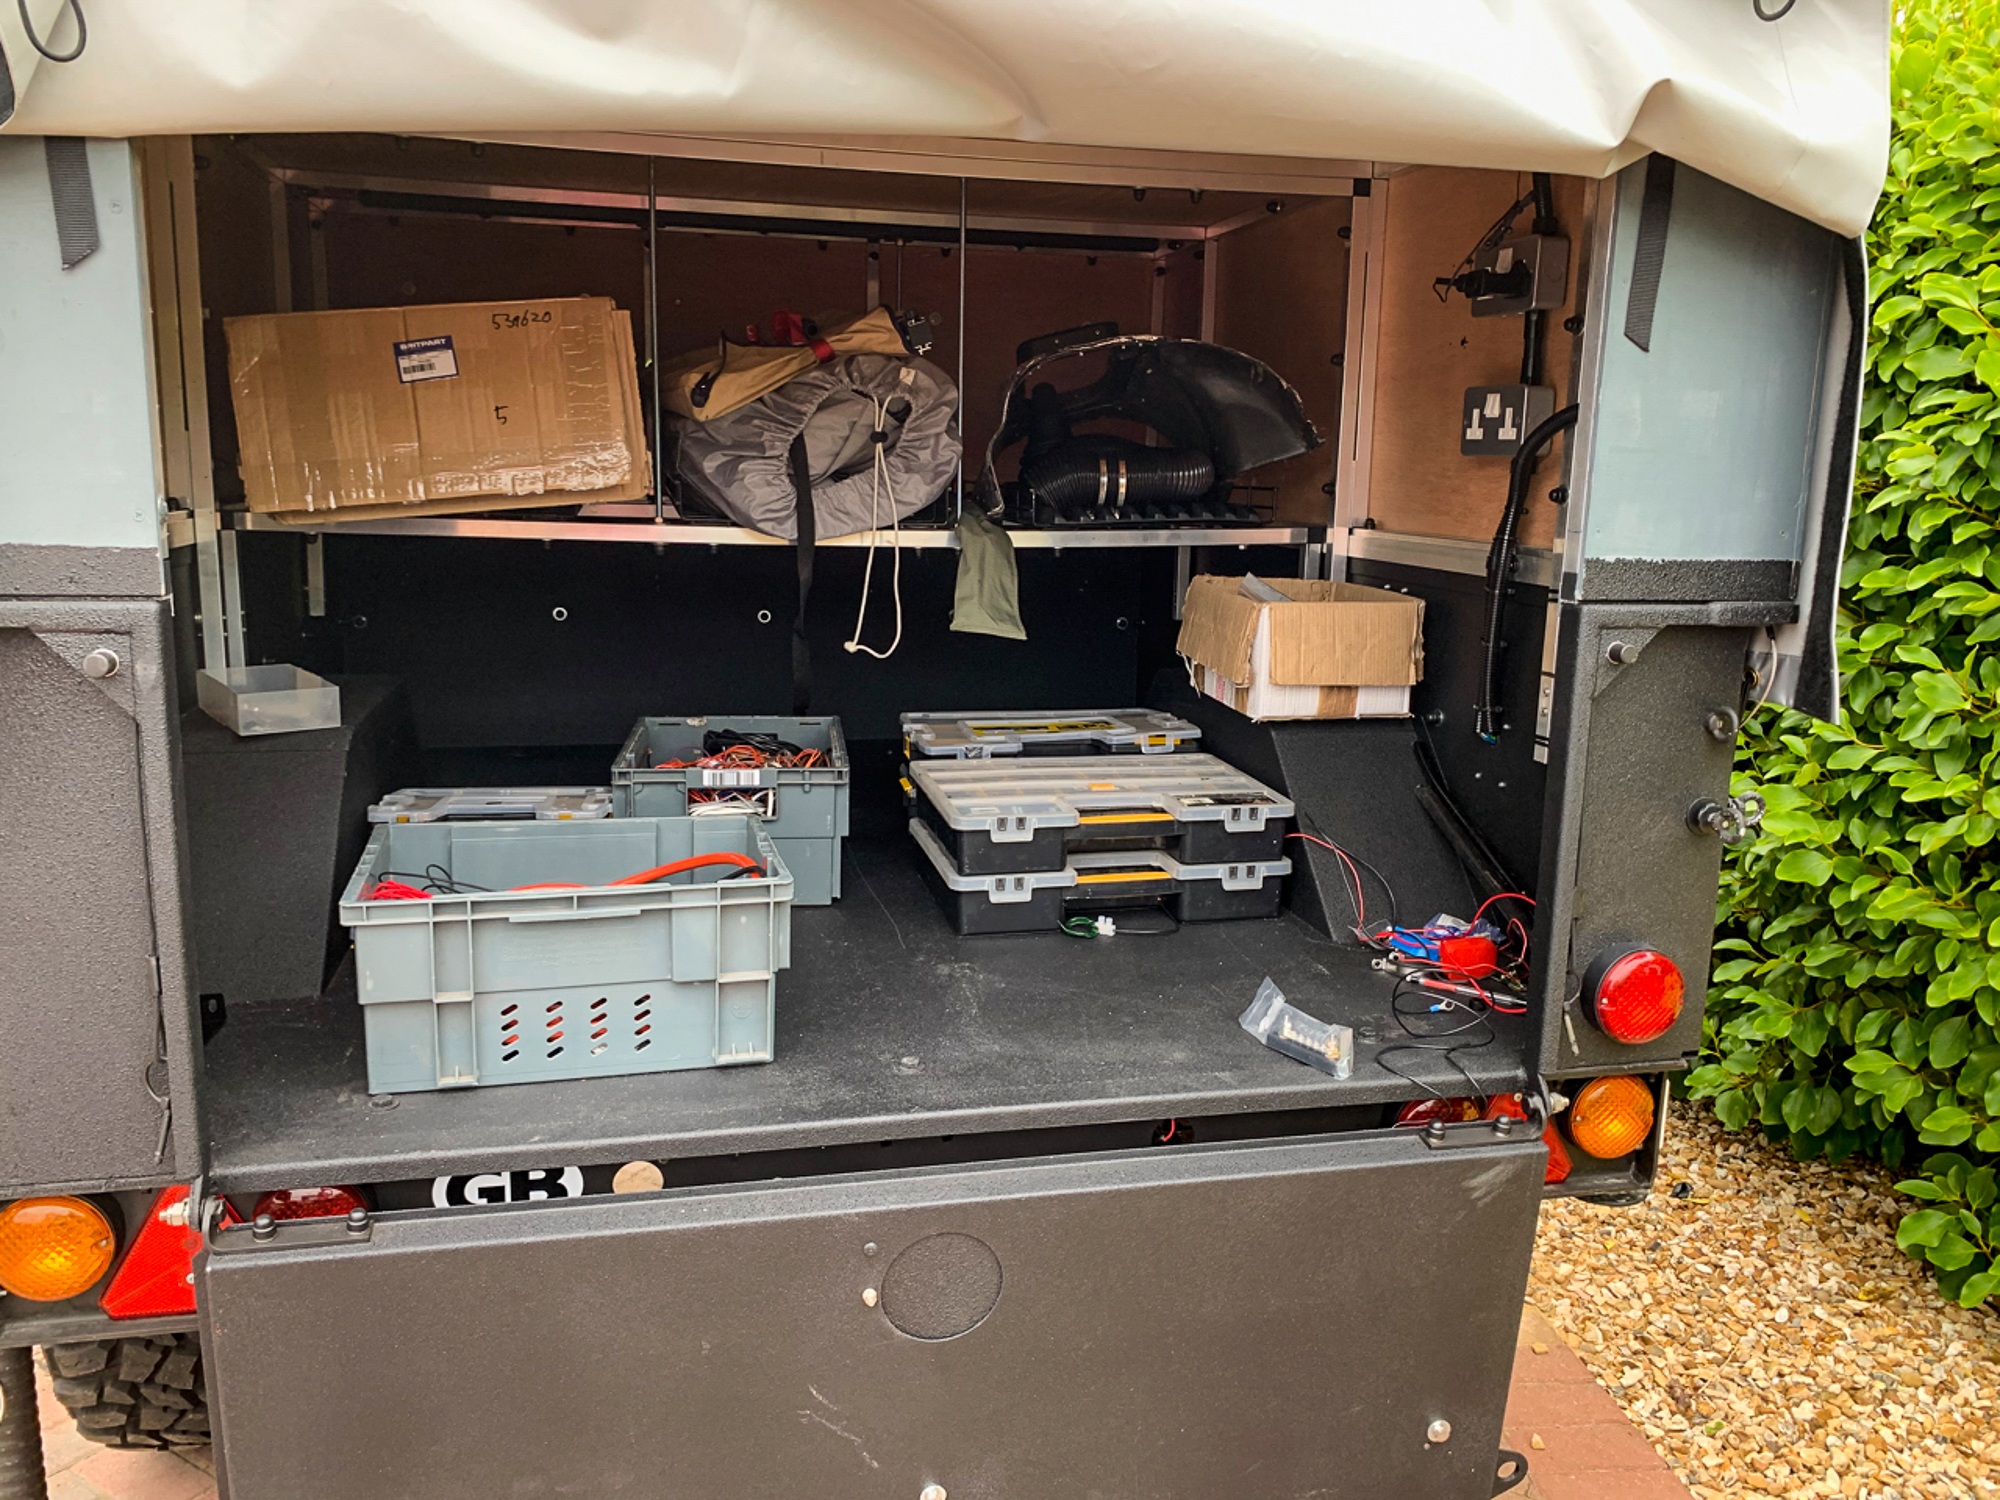
We have tested the tent which is a doddle to put up, it also comes with a rear awning which is great for keeping dry during rain showers when working out in the front garden. For now it is being pressed into service as a parts/tool store, it has saved me hours of walking back and forth to the shed for bits!

Hmmmm….shelter when working on the car on the drive – this leads me to the next post.

The wheels have arrived, so lets get on with the fitting.

The wheels arrived in 2 days which is great service from 4×4 Tyres, I also ordered a set of locking nuts and new lug nuts for the wheels.

I had already ordered the tyres from New Milton Tyres, a local business just down the road, £147.50 each fitted for the AT2’s – cheaper than any online quote and no carriage. However, the AT2’s were coming the end of there production run with the AT3 now available. So I took the wheels down that afternoon to be fitted. It turned out that the 285/75’s for some reason do not have the lettering in white on the sidewalls – a bit of a shame but one less thing to keep clean and maintain!

On returning home I rolled one wheel out and placed it next to the car to see what it looked like…………..Well, it looked massive………….

Old and New Side by Side – it’s looks a bit big!

For a moment I thought I had got my calculations wrong, but then I put it down to an optical illusion, because the new wheel was not in situ.

So to work! The Perentie is a heavy old vehicle and I had ordered online a 3 ton trolley jack. I write this during the lock down, so nothing open locally. Anyway the promised next day delivery was not forthcoming, only an e-mail saying it would be 10 days or more – thats Euro Car Parts for you – not impressed. So, I pulled out the 4 Ton bottle jack that had been sitting in the shed for years and used that, sat on a couple of bricks. It worked fine, straight onto an axle stand and a small trolly jack under the diff as insurance………

Jacking it up and keeping it up!

Then I sorted out everything that I would need to remove the Boost Alloys, clean up and install the new wheels – with everything to hand, the vehicle would have less time in the air!

Tools set up ready.

So off with the first wheel, no problem there. Thankfully no problem with removing the spacers either, whoever had put them on had done a proper job with Copper Ease. Just 5 lug nuts to undo.

Wheel spacer for removal


Although the wheels will be off again for the Suspension upgrade fairly soon, it was worth doing a clean up with a wire brush and some brake cleaner.

Hub after a clean up with a wire brush

So then is on with the new rim, these things are heavy and I wanted to be sure that I could do a tyre change on my one – just in case. It was actually much easier than I thought, I had jacked the vehicle up just enough, so I did not have to lift the wheel too high, so it was a simple process of lining up the studs, lifting the wheel to rest on the hub and then lifting it on to the studs – then nuts on, down on the ground, tighten everything up and stand back to admire!

New Moduar fitted – looking good (not too big)

Repeat three more times and everything is looking good – very smart.

The Perentie with new shoes.

I will have to replace the wheel arch extensions with something a bit wider as the 8 inch rims give a slightly wider stand than the 7’s with the spacers. (See previous posts). I don’t think it would be an MOT fail, but the tyres will certainly throw plenty of road muck up the side of the vehicle if I leave it as it is.

Also some covers for the wheels nuts

I will probably get the Britpart ones, rather than some of the other very expensive aftermarket options.

Tyres – Lots of choice?

Following on from the previous post about my wheel choice, I now need to make a decision about tyres.

I had decided to get 285/75 R16 to go with my 16 x 8 Steel Rims, so the choice from your tyre supplier web site was soon reduced to the usual favourites: BF Goodrich, General, Cooper, Insa, Toyo and Radar.

These are then usually described as all terrain or mud, whilst Coopers have a great reputation, they are really for proper off road use and most of my miles will be done on road, same answer for insa.

The Toyo’s were also mud rated, and along with the Radar’s, tended to have low stock levels, so they probably did not sell very many. The Radars were also a bit too cheap for my liking, after your life depends on these pieces of rubber.

So we are not surprisingly down to General and Goodrich. So we drill a little deeper.

Speed ratings are not really an issue for Perentie drivers……….so we look at the load ratings. This is usually the number at the end of the description – the speed rating usually follows, so for 116 R, 116 is the load and R the speed rating. The load rating actually defines the maximum load moving at the maximum permissible speed, so thats why they are together I guess.

Remember from the previous post my wheels have a load rating of 1200kg, as I was comfortable with this.

I am down to 2 choices now; BF Goodrich T/A KO2 all terrain 116R and the General Grabber AT2 121R. The 116 is a 1250kg load per tyre and the 121 is 1450kg per tyre. The AT2 is £30 less expensive online so a no brainer.

A double no brainer really as I have been running the Grabbers on all of my Land Rovers for 10 years with no problems whatsoever.

I will source the tyres locally to support local business, but I suggest the differential will be similar. I might even get a good deal!

General Grabber AT2


Just need to get some new wheel nuts as the ones for the Boost Alloys will not fit, but no big deal.

Oh, and some of those cool wider wheel arches – even with the existing wheel/tyre combo I get loads of mud thrown up the side of the vehicle, so that is also on my list.


New wheels…….some thought needed!

Want a wheel upgrade – easy! Choose some nice rims swap your rubber over and your good to cruise the streets right. Well No! – there a number of things that need serious consideration and I must admit it took me longer that should have to reach the right conclusion for me.

Now the standard Perentie will run what they call a Wolf Steel wheel, or heavy duty – 16 x 6.5 inches – very tough with a load rating of 2200kg. Narrow, but not as narrow as the 5.5 inch standard Land Rover, which makes the addition of cool wider tyres a non-starter on these rims – unless you want to push safety limits.

Wolf wheel

A popular upgrade and fitted as standard on many Defenders is the Land Rover Boost Alloy – a bit wider at 16 x 7inch, so you can fit 235/85 R16 tyres as standard and they look pretty good and so the job perfectly. These have a load rating of 1050 kg, so you have to be a little mindful of this if you are running a modified 110 or 130 with extra weight on board. Weight is not always evenly distribution to all 4 wheels, especially when off road.

Boost Alloy


The Perentie is fitted with the Boost Alloys but with 265/75 R16 tyres, 30mm wider than the 235’s giving the car a bit more rubber on the road – Probably as wide as I would want to go on a 7 inch rim – but a popular fit. The 75% ratio as opposed the the 85% with the 235’s keeps the speedo correct.

In addition to the wider tyres, the Perentie also has 30mm spacers giving the vehicle a wider stance, this also helps the tuning circle. Overall the wider tyres and stance suit the Perentie, they help balance out the additional height of the roof and the 2 inch lift on the suspension. I am not overly keen on spacers, as it is just something else the can cause a problem

The Perentie could handle a larger wheel/tyre combo as there is plenty of room under the wheel arches, but that is the way it was designed and I like to have the available suspension movement. This would also put the speedo out and again, I wish to avoid as many issues as I can.

Perentie wheel with spacer


Whilst I wanted to change to stronger wheels and have newer tyres prior to our trip, there is no urgency as the current General Grabber AT2’s still have plenty of wear left in them, although I am not sure how old they are.

However, my 110 G4 Challenge is due for an MOT and last year the tyres were an advisory as the side walls are now starting to deteriorate – not bad as I am sure they are the originals -13 years old and 60k miles – and still nowhere near worn out though. As I may well move the G4 on in the Summer, it seemed pointless spending £600+ on tyres and not get any use out of them. Still there is now a safety issue and the advisory does show on the DVLA MOT Check, so this needs to be sorted.

So the plan is to move the good tyres from the Perentie to the G4 and get the Perentie new shoes and better rated wheels – I will then have a spare set of Boost Alloys which will go towards the new purchase – clever Huh!

So which wheels to get……….Alloys are lovely and products from manufacturers such a Zu, Mach 5 and Terra Firma look great and more importantly have high load ratings, up to 1500kg. But the Perentie is a working vehicle and thin spoked alloys will just allow you to see the old drum brakes behind – not a great look. Also, I have other things to spend nearly £1000 on!

So steel wheels it is. I love the Wolf/Heavy Duty look but as we have said they are not wide enough for the tyres I want. There are not many style options out there and Spoke Steel and Modular (with holes) come up all the time. Where there is a difference though is with quality – nothing new there. When you see a good deal they are often labelled as “after market” and are Chinese – you tend to find that load rating are missing from the web descriptions – and not easy t find if you call the Sales Team up. You are never quite sure if the information that you are being given is correct.

Anyway, I eventually found some made by Tuff Torque from 4×4 Tyres, they were rated at 1200kg which was good for me. When I called them they confirmed that they had been using the European Manufacturer for 20 years with any problems. – they were also very helpful generally. Unlike some other popular Land Rover Parts suppliers who either did not answer the phone, or were unhelpful.

Now before finally choosing your wheels we have to consider ET; no not your favourite stranded Alien but “Einpress Tiefe” the German phrase that means the distance between the mounting surface (hub) and the centre line of the wheel. Every wheel has an ET which to me is confusing as for every millimetre the ET value “decreases” the further out the wheel protrudes from the arch.

So the Boost Alloys have an ET of 33 which is a positive value, and I have 30mm wheel spacers. The wheels I found come with different ET values one of which was “0” – Zero. Thats means that my new wheel will protrude further from the arch and Zero is less then 33 – so I will not need the spacers – which is a result.

I also decided to order 16 x 8 rims rather than 16 x 7 giving me a further one inch width than I have now, which I think will suit the vehicle and give me a bit of stability. I can then fit 285/75 R16 tyres giving me another 20mm of width per tyre. The 75% ratio with the 285 width changes to rolling circumference of the wheel slightly but within an acceptable tolerance, according to the online calculator. We will see when they are fitted.

So I have ordered the 16 x 8 Tuff Torque Modular Steel in Black with an ET of Zero – these have load rating of 1200kg which gives me 48oo kg which is fine for me. I will get 4 to start with as I need to understand weight and whether the spare will work with the read spare wheel carrier. If not I will keep one of the Boost Alloys for the spare, or get something else if I need a greater rolling circumference to match the new wheel tyre combo.

Now, which tyres shall I go for………..


Electrics – Getting there.

Phil and I worked together for about eight days on the car through January and February. We tried to get “rain free” days by carefully checking the weather and to a point we succeeded in achieving that. It was cold, especially first thing in the morning and at the end of the day, but overall the weather was not that bad. I would get on and do bits of preparation on the days that Phil was not there.

I wanted to get on rather than wait for better weather as I had planned to get on and landscape Benita’s garden in the early Spring and I had the time. Believe it or not, we were still unaware of the impact that Covid 19 would have on the way that we work together. We all got on well and Phil stayed over a couple of nights to save the long drive back and forth to his home. Benita who is a great cook would sort dinner and we would enjoy a couple of glasses of wine and some music as both of us play guitar. Those times now seem so far away as restrictions prevent us from enjoying the simple things in life such as each others company, conversation, jokes and music.

The Perentie is a very basic car when it was in service with the RAF and ours was fitted with an early TD5 dashboard when it was imported, in order to give it a proper key ignition for example.

I wanted to upgrade the dashboard so that I could use the better made Raptor Engineering dash binnacle in front of the driver. Raptor make a steel binnacle and front dash panel which replaces the plastic Land Rover one, you just need to source the screw in instrument light cluster and connections to the loom. I managed to find one on e-bay locally and drove to the other side of Bournemouth one evening to collect it. Ironically I put some of my spare parts on e-bay a few weeks later and they same guy turned up at my door after having purchased – small world!

Raptor also make a centre dash with many customisation options for gauges and switches which I am also fitting.

Note that everything is wired into multi-plugs to make the removal of the bottom section easy. The small holes in the bottom of the binnacle in the top picture will house LEDs to illuminate the footwells.

All starting to come together, lots of wires but everything labeled and I have a separate schedule that details wire colours and fuse numbers for every circuit.

At this stage all of the main circuits had been tested and were working fine. Most of the instruments had been wired up. but the speedo, fuel gauge need to be tested along with the warning lights.

But that is for another day as I have to landscape a garden and build a log cabin; and of course deal with the lock-in!

I hope everything still works when I get back to it……………

Re-Wire progress at last!

Following from the re-wire posts, today is the day that Phil, the auto-electrician is due to arrive, all the way from Fareham, which is a fair drive, especially given the traffic on the M27/Lyndhurst.

Unsure of an exact arrival time I decide to remove some the cabinets in the back of the Perentie in order to figure out how the lights in the Alu-Cab roof tent work. After a while I hear a voice “Do you need some help with that” – Phil has arrived.

We spend some time looking over the job, the work that I have done, which is all good and talk through what needs to be done and in what order it needs to be approached. More importantly we sit and list all of the circuits that we need and total up the number of fuses that we need and work out which circuits need relay. We then look at where all of these are going to go as space is limited behind the main dash and the new centre dash, especially taking into account the amount of wiring that I am adding.

We need nearly 30 fuses and the existing fuse box is inadequate. We agree the we can use 3 smaller fuse boxes and place these in the centre of the bulkhead inside, one in the middle and one either side. I agree to source and fit these so that we can get on with running cables to the front of the vehicle on Phil’s next visit.

I had removed the LED lights that were fitted the the Perentie as not only did they look wrong, but were not working correctly, probably due to the dodgy wiring. I elected to replace these with proper original equipment lights. At least if one was broken when we were away, it would be easy to replace he fitting or the bulb. Again, I agree to source and for these ready for Phil’s next visit, in fact I was able to wire up the front part of the vehicle.

Now I have mentioned in the past that I do not have a garage, in fact if i did, the Perentie would be unlikely to fit due to its height. So we will be working outside on the drive and it is now February, cold, rainy and very little light after about 4 o’clock – Phil was still game. He has more insulated clothing than I do!

Working in the rain.

The patio sun shade comes out of storage and comes in useful when it is raining, note the the additional lighting under the bonnet!

We crack on over a number of days in February often working until six or seven o’clock with he aid of work lights and hot tea. We make great progress.

An update in the next post.

In case you are wondering, the orange reflection is my G4 Challenge Land Rover Defender parked up next door.

The re-wire – Getting on with it.

With the re-wire delayed (see the previous post), I had the time to review the whole situation.

I needed to find another auto-electrician which I knew would not be easy and I had some time to really think through what I needed in terms of wiring for the front of the Perentie. The loom running through the chassis to the rear had been tested and was fine; the chassis part of the loom contain a load of wires for a tow socket that were not going to be used, so these would provide back up if needed. I already knew that I had to re-wire the rear lights and add a Rear Fog light which was missing.

I had already decided to use the standard Lucas wiring colours where I could and would document the colours choose for other additional circuits. This would be a huge improvement on the multi-coloured arrangement that we had before with a wire starting off as one colour, ending with another random colour in the middle.

All circuits would be fused individually and relays added for everything that used higher currents, removing the load and stress from the ignition switch for example.

Wires for the front and engine bay had added circuits for driving and fog Lights, high amperage circuits for an electric fan and a winch and a couple of 17amp circuits just in case. Additional I ran extra earth wires so that I could reliably earth everything to a point on the inside of the bulkhead, rather than randomly found earths at the front where they would be exposed to the elements. Also, a couple of wires for additional instruments later on.

The windscreen would be swapped out for one that was electrically heated and wiring provided so the electric windows fitted in the upgraded Puma doors would actually work.

Inside, I re-routed the wires for the existing front light bar and individual work lights on each side and added provision above the windscreen for a power supply that could be used for a better interior light, a CB, sat-nav and dash cam. Also, I ran a wire back down into the car that would take the input from a Solar Panel later on.

The Alu-Cab conversion has a very useful shelf above the windscreen because of the additional roof height.

In addition I decided to add a centre dash to house extra instruments and switches as well as upgraded Radio with a large screen that can used for navigation – more of that later.

So now I was back to needing someone to help me out, so back to Google with a net spread wider for an Auto-Electrician. (Mobile). This tuned up a few more people, but again their web sites were after straight forward business, ICE, upgrades etc.

Then the Classic and American Car Web Site appeared in my search, a fair way from Lymington in Fareham, but areas covered included Hampshire, so that’s me! I e-mailed one Phil James who described himself on the web site as a child from the fifties, I described myself as a child from the sixties……….will I get a response.

Soon the phone rang, an unknown mobile number, It was Phil. He would be near to Lymington soon and would love to come and look at the job. Shortly afterwards an e-mail and a date and time in the calendar.


A New Year and a decision made – Just as well as it turns out!

With a poorly Perentie on the drive and a massive list of jobs and improvement work to do, as well as the re-wire, it was clear that we were not going to be travelling to the USA in 2020; so that was another Executive decision, this time, sadly made.

Please bear in mind that the decision was made before we were to realise the extent forthcoming impact of Covid 19 – Good job we had not booked flights and shipping.

However, we will continue with the work on the Perentie and make the trip when it is safe to do so, both health wise and politically.

On a positive note this removes all of the time pressures and will enable us to visit other places to test out the Perentie fully, before we head for the States.

One day, this will be our home…….for a while.


A Land Rover that leaks – Surely not! – Part 2

One good thing about working on a Land Rover is that there is loads of room in the back for all of your tools, parts, radio and other paraphernalia that you use.

If you plan ahead, this saves multiple trips back the shed/cabin for whatever it is that you now need!

When you are done for the day, just put everything into the back lock the door and its all there ready for you the next day.

So most stuff I use is near the back door, or I can reach it from the front seats; but over time more stuff build up in there………So one afternoon I had climb in to get whatever colour wire I needed at the time – Hmmmm, wet knees…….

Further investigation uncovered the fact the whole of the carpet and the insulation underneath was sodden, also on the right hand side the carpet that covers the box section towards the front. The rear section and the left hand side was dry above floor level. What a pain – another load of hassle.

Unfortunately I don’t have pictures, but the rear of the car had a huge custom made steel cabinet behind the front seats, this sat on top of a Transk9 gun safe. Just inside the rear doors on the left and right were further metal storage cabinets – all of these bolted through the floor and sides on the Perentie and on top of the carpet. Two hours later they were all removed, I was on my own and it was all I could do to get the cabinet and gun safe out of the vehicle and into my cabin for storage – I then removed the wet carpet and insulation for drying – this left the metal sound proofing material which is everywhere in the vehicle and which I have mentioned before.

After the removal of the “furniture” and carpets

Now I need to find the leak, so out comes the hose again, eventually I could see water coming in where the sides meet the “tub” – it looks like it is seeping through the rivets.

It is worth remembering at this stage that originally Perenties has no sides, no roof, and no back door, so these have all been added – after its import to the UK.

So I drilled out a couple of the suspect rivets which were too small for the holes and replaced them with a larger size – it still leaked.

There is a rail inside the vehicle which can make it difficult to see exactly where water is coming in, but I was sure that none of the holes in the side and the “tub” into which they were riveted lined up, so further holes were drilled for the previously mentioned “too small”rivets.

So one by one, I drilled put each rivet along the side and replaced it with stainless steel bolt, with a healthy squirt of sikaflex in the hole – I thought that should sort it! It also secured the side to the tub better as well.

To make a good job of it, sikaflex was piped deep into the joint between the side and the tub, along the length of the vehicle.

So far anyway – the leak has gone……………

Hopefully, there should be no more.

Planning the re-wire and a moan about some Auto-Electricians

After having deciding that the Perentie needed a complete re-wire I thought that I would take some professional advice before proceeding.

I am no auto-electrician, but competent with a wiring diagram and a pair of crimpers. However, I needed someone to help me get started given that nothing was fused correctly or run through relays. I also wanted to build in additional circuits that I would need in the future. So the search for an Auto-Electrician began……………….

I wanted someone mobile as I wanted to do most of the work myself and I did not want the Perentie languishing in someones workshop for weeks on end with costs spiraling. I turned to Google expected a list of people to call, but I was disappointed.

It seems that where I am, Auto-Electricians are a dying breed. Whilst there are people around with flash workshops who are happy to diagnose faults and do engine ECU upgrades and a bunch of people that just want to do Entertainment Systems – not a lot else. I found three, one via Facebook none of which answered the telephone or replied to voice mails or e-mails. I asked around at at my friendly local garage and got two of the same names and a warning that “they were not great” – fills you with confidence.

Eventually I spoke to one guy who was not interested without a wiring diagram for every connection. As a last resort I posted on the local Facebook Group and one of the same names came up again, I just replied to the post saying that I had tried him but to no avail and within 30 mins got a call from him………….

An appointment was duly booked and we looked at the job together and I ran through my requirements. He was with me for nearly 2 hours during which time I was regaled with stories of all of the rich and famous people that he worked for locally. The job was apparently no problem, I would make up the basic looms for the front to start with, remove the existing wiring and he would return in two weeks to start the job – all booked in the diary.

I was happy as I had wasted a couple of weeks trying to find someone and we were heading for the end of the year.

Preparing to build the loom

Well, you will not be surprised to hear that he did not show on the allotted day and did not reply to my telephone and e-mail chasers. I ever said, “if you don’t want to do the job, just say” – no reply. Maybe I was simply not famous enough, or maybe the job was too much like hard work…….

So now a Perentie totally stranded on the drive and it’s nearly Christmas.

One Chance to See the World

Insta @onechancetoseetheworld