Finishing off the main dash wiring.

Well, I have mentioned this before, so just a quick post; promise……..

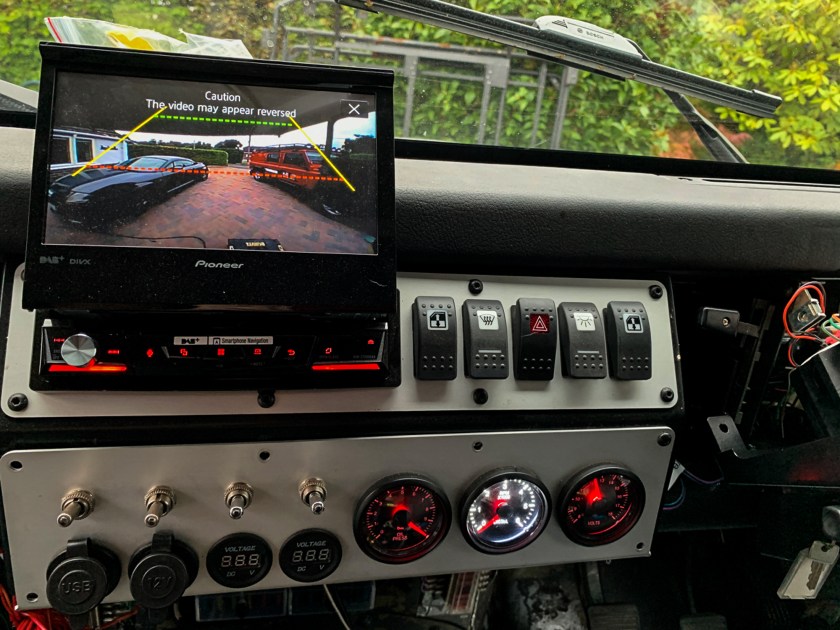
All of the dash wiring has been just about completed for a while, apart for the connections for the Rev Counter and Oil Pressure Gauge, and…………a reliable feed for the instrument lights in the main dash.

The original instruments were in poor condition and I tried to fix these up. In a nutshell the sleeve that the bulb holder fits into was broken on a couple and the green plastic diffuser that sits inside was melted, due to someone in the past fitting the wrong wattage bulb. As the lights were so dim, people upgraded the 2W bulb to a 5W – but this just melted the whole fitting after a while. The original bulb holders are impossible to get so I just made do with a later style fitting; these did not really work as the LED lamps that I was using did not fit correctly and the lights kept turning off!

The old instrument with the missing bulb holder and melted diffuser.

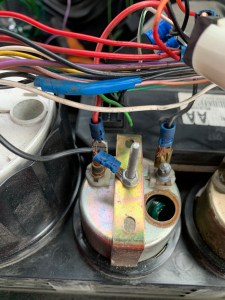
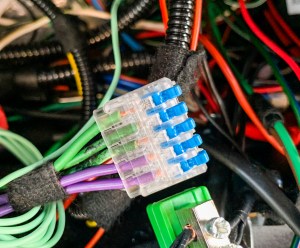
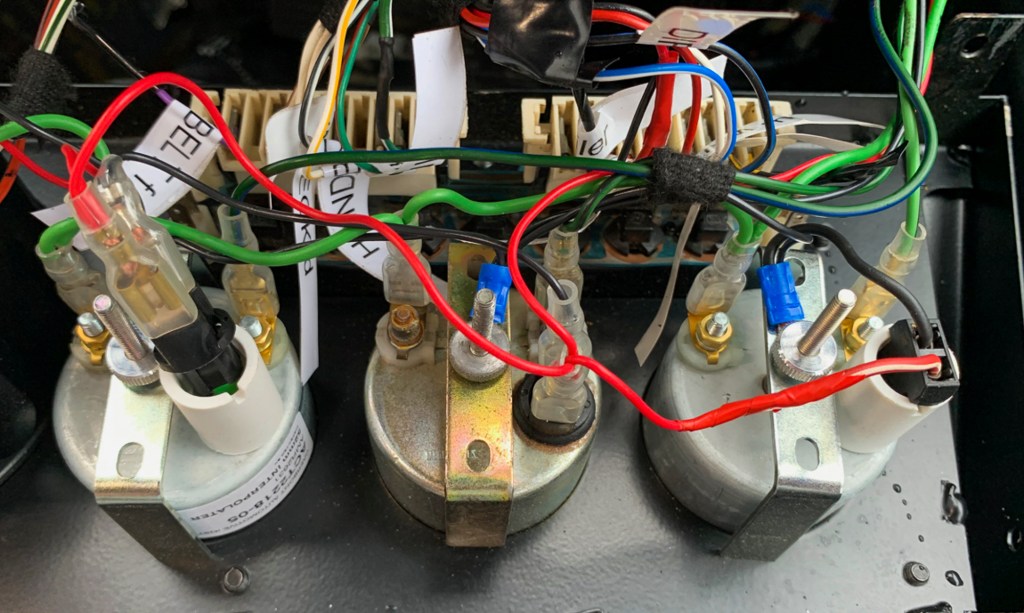
So when we we did the re-wire, we made up a wire loom that connected everything together, so that it worked. Relatively simple; each needed an ignition feed, an earth, and an earth and 12v feed to the instrument light itself. Also the feed from the sensor for the instrument itself, so from the water temperature sensor and the fuel tanks.

You can see the fixes, with the later bulb holder (YAJ100390)

So in the end I just got a new water temperature gauge and two new fuel gauges, as I wanted to be able to monitor levels on the second tank once it was installed. Whilst the new gauges came with the sleeves that the bulb holders fit into, thats all you got. No bulb holder as these were part of the loom.

So I ordered a dash loom that Auto Sparks lists on their web site, that was in June and it arrived in late September due to Covid issues as all their looms are made to order. So I was ready to complete the job……………

New Auto Sparks Loom – Very Good!

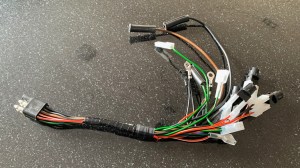
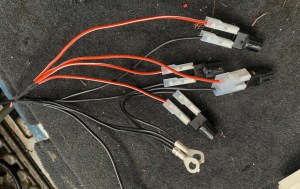
Well the loom did not quite match what I wanted, a couple of bulb holders that obviously were for a speedo head that I did not have and no ignition feed linking the instruments and a couple of other 12v power leads that, in retrospect were for the clock that I had removed and replaced with the second fuel gauge. The positive was that I had the bulb holders that I needed, so I just cut these out with the respective earths and left the ignition feeds that we had made earlier (just like Blue Peter!).

The bits I used.
New bulb holders in place.

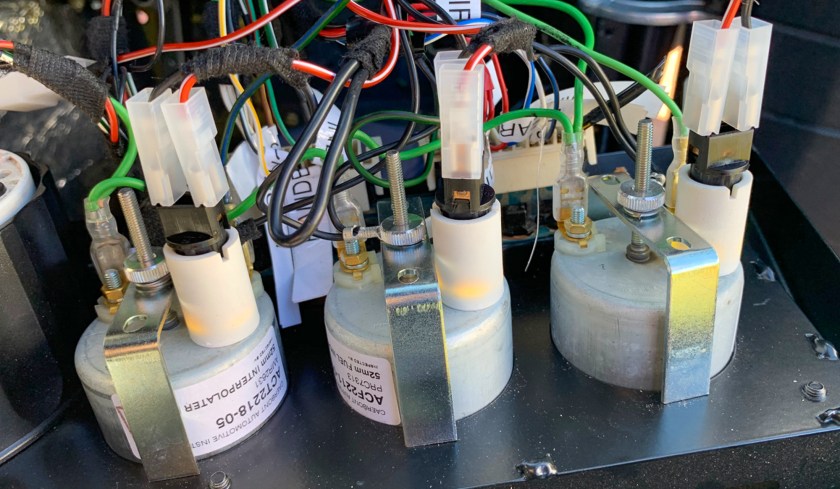
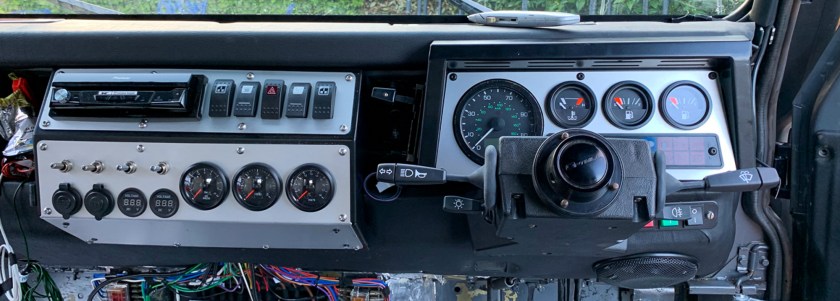
So all done and ready to test…then I realised that the bulbs were different………..So a trip back to auto-leds who are extremely helpful and efficient, and I got these. Cool white as the new instruments has the green diffusers in situ..

New LED bulbs, all good.

All done, at last; another tick in the box.

New dash panels all in and done – at last!

Note:

After fixing the dash panel back into place, which was a real pain; because it was all new and none of the fixings lined up correctly. One of the instrument lights did not work. So I had to undo it all again. It turned out that one of the bulb holders had come out of the sleeve on one of the fuel gauges; they were not the best of fits, so it must have come loose when I was getting the dash back together. Anyway, they are now secured with some insulation tape to make sure it does not happen again.

Installing the camera’s

Whilst there are other jobs to do on the Perentie, a couple of these are quite big projects and installing the cameras is something that I can be getting on with in the meantime. Also, you cannot really see out of back when reversing and with the extended chassis at the rear, it is easy to bump into things……..so safety first.

Also the installation will involve running and connecting some further wires, so I want to get this out of the way before finally putting the dash back together. I would like to say “finally”, but it will alway need to be dismantled again for some reason. Also, some of the wires need to be run from the front (dashboard and the shelf about the windscreen), to the rear of the vehicle behind the trim above the windows; so a time consuming task.

Also, I had done the research and had all of the parts that I needed.

I decided to run with the reverse camera linked to the Pioneer head unit because of the screen size/resolution,(See a previous post). The inexpensive dash cam purchased from Amazon which had the additional rear camera that records, would be useless for reversing due to poor resolution and the fact that the display is only 25% of the tiny screen on the main unit; see image.

The red portion is the image from the rear camera; but at least I know it works.

So, the dash cam needs to be on the windscreen, luckily I have a shelf above because of the Alu-Cab conversion, which avoids trailing wires from a cigar lighter. Both cameras have to have power and video feeds from there respective cameras.

So, reverse camera first, power was relatively straightforward. I undid a previously soldered joint and used a multi connector to add the ignition power feed for the camera. At the same time I added a second ignition feed which I would have to get to above the windscreen (up to the shelf), to power the dash cam. Previously I only had a permanent 12v feed above the windscreen as I thought that was all I would need!

I also added an extra ignition feed which I fed outside of the dash ready to go to the rear of the vehicle in case it was needed later.

Ignition feed for the reverse camera.

Above the windscreen I already had a permanent 12v feed powering some internal lights/CB/USB Charger etc via a fuse box. I just added another fuse box with the ignition feed in case I need to add other stuff later – I put in an additional cigar lighter charger as I had one on the shelf.

Ignition fed fusebox – ready to back on the shelf.

The reversing camera then needed an RCA connection into the head unit – the camera lead needed to go to the back of the vehicle up the inside of the A post and along above the windows to the rear. The dash camera gets its power from the aforementioned fuse box and the camera connection has to make the same journey as the Reversing Camera, apart from the journey up the “A” post at the camera is already on the shelf.

The reversing camera had a fixed connector on it, and it was touch and go whether I could squeeze the fitting through a small gap where the windscreen shelf met the Alu-Cab roof – it just fitted.

I then needed to drill through the upper shelf to get the power (usb) and camera feed to the dash camera.

Front wiring done I had to decide where to position the cameras at rear. I already had some holes from the previous installation so wanted to use these as far as posssible…………….not happening.

Nothing was in the correct place so I decided to mount the reversing camera just above the horizontal centreline of the vehicle; any lower and the image would pick up the jerry can holder fitted to the bumper.

Note the protection around the cable to prevent chaffing, there is also more protection in the hole which will ultimately be fickle with sika-flex for waterproofing.

I intended to use the old mounting points for the dash camera. In the end I had to block off the old holes with checker plate, seal with sika-flex and start again.

The mount supplied with the dash camera was not great, so I sprayed it with primer and added a thick coat of “chassis black” to ward of the dreaded rust.

I decided to mount it higher as it really needs a wider angle view of the road at the rear of the vehicle and a good view of what is gong on, rather than the focused image that you need for reversing.

Anyway, after a load of hard work and problem solving, it all works!

Reversing camera working!

Just need to amend the green and red guide lines to suit. However it seems to clear these every time the battery is disconnected, so this can wait!

A bit of a review…..

So where are we………..I keep a to do list of jobs to be done, so it might be worth documenting these; in a way mapping out the next couple of months.

The suspension is now OK apart from the Radius arms that were an MOT advisory, I will research and get heavy duty replacements at some point. The leaking steering box, also an MOT advisory will be replaced with a heavy duty one in the next couple of weeks.

Regular readers will know that the water pump has leaked since we have had the Perentie and it is getting worse. Replacements are impossible to get in the UK and I am loathed to take it of on the assumption that I can get it rebuilt, just in case it is a basket case. It will do as a spare if a rebuild is possible.

Along with the Water Pump there are a few other parts that I can only easily get from Australia, the thermostat, bypass hose, timing cover gasket (which also leaks) and rear crank seals, that I will need at some point.

I have been communicating with KLR in Oz for a few months to try and get these parts. Anyway, long story cut short, my friend and Land Rover guru Darren, happened to be having some stuff shipped from Oz via KLR, so he offered some spare space in his box so my parts would have some company on the journey to the UK!

There was a little extra space so I ordered a rear disc brake conversion kit – more of that later.

Anyway, the shipment should be on its way next week, so I will schedule a strip down of the cooling system and replace all of the suspect parts and cooling hoses and heater matrix – again more later.

I have been slowly identifying leak points at the front of the vehicle and will be doing a “hose test” shortly to see if have succeeded; Benita will will enlisted to help out on this one……. Many holes have been sealed by one means or another, so hopefully we will have a Winter of dry footwells (stop laughing!).

The main wiring is done apart from a coupe of things. I ordered a part for the wiring loom that runs to the main dash instrument lights from Auto Sparks in June and this arrived this week! This was because you cannot get the instrument bulb holders as a spare part and my LED replacement bulbs would not reliably fit in the rather knackered original bulb holders. Also, I need to run a couple of extra ignition feeds to power a dash cam and the reversing camera – again – more later.

Auto Sparks loom for instrument panel


With the starter battery moved, I can now get the additional fuel tank fitted under the passenger seat and the corrosion in the drivers footwell sorted at the same time. Then I need to find a way of pumping the fuel from the spare to the main tank. Anyway, once the main work is done and the leaks sorted, I can soundproof the footwells, and get the floor and gearbox tunnel back in – that will be nice and much quieter. I will miss seeing the road as I drive around.

Once all that is done we should have a decent road going vehicle for the Winter and I can turn my attention to planning the wiring and fittings for the rear, fridge, leisure batteries etc.

In amongst all of this lots of other little jobs are being done, for example I have cleaned out and re-painted all of the side lockers – the one I did for the new starter battery made the other look dreadful.

I also added checker-plate on the floor with a neoprene lining underneath and repacked the seals. I used 2mm checker-plate for the sills, but the 3mm is much better and does not cost much more. I also fitted checker-plate into the rear jerry can holders which have just been powder coated.

I am also, gradually wire brushing and repairing the non galvanised underneath the car, axles, suspension components etc. This not only makes it look better, but will prevent future corrosion.

Dash Cams and reversing cameras!

When we first collected the Perentie, one thing that it did have and that worked was a half decent double din sized car radio with a reversing camera.

When I decided on the new dashboard arrangement using the raptor engineering product we did not have room for a double din sized car radio – I also wanted Apple CarPlay so that I could operate the phone from the radio and use the Apple Maps App, this would also give me the option to use other mapping apps such as Waze, which seem to work well.

I did like the idea of a decent sized screen, especially for the maps, so after some research decided on a Pioneer AVH-Z7200DAB 7″ Flip-Out Multimedia System, which had a reversing camera facility. I figured that the flip out screen would just about clear the dashboard when mounted in the raptor dash – I was right….just!

Pioneer with flip out screen.

The existing reversing camera was externally mounted and was well rusted for some reason, so it was to be replaced. I also suspected that it might not be compatible with the Pioneer. As previously mentioned the radio was fitted early on – when the dash went in and only now am I looking at the camera etc.

Following our accident in the Autumn, I had been thinking about a dash cam and had purchased a Ring RBGDC50 a while ago.

I follow a You Tube Channel Grizzly N Bear about a great couple that are overloading around the world. They had their Land Rover 130 written off early in there journey in Spain and video footage would have made their insurance claim much easier. They did a post abut this subject and decided on a Jeemak product that had a rear camera that also recorded in case you got hit from behind – this also doubled as a reversing camera. This is what I need – me thinks!

The Jeemak product is not available anymore, so it was back to the research. This threw up many products from Garmin, Road Angel, Black Vue, Think Wave, Viofo and many others.

What became immediately obvious was that most did not record from the rear. If they did have a rear view facility at all, this was either a stick on camera (no use on a Land Rover), or the rear view module was placed on the rear view mirror and relied on a view through the rear window. Again useless as I wanted a rear camera that would securely bolt on the the back – I would probably make up something to protect it from knocks. Also, prices varied widely from hundreds of pounds to very cheap – I did not want to spend a fortune!

It would have been nice to have something that recorded the interior as well, in case someone broke in. But then you can’t have everything and you have to consider power usage as an internal camera would need a permanent feed.

I eventually came up with a product that seemed to tick all of the boxes made by Yundoo whoever they are – mind you – I had never heard of Jeemak and that seemed to work OK. Anyway £30 and 12 hours later – Thank you Amazon – it is sitting on my desk and looks – not too bad. We will see – I am not expecting too much from the rear footage.


The Yundoo does need a feed from the reversing light to switch on the reversing camera; but luckily, I had already put one of these in when I did the rear lights, to avoid having to cut into the cable at the rear of the car. Prior to this thought process, I had also made provision for the reversing camera on the Pioneer by connecting a wire directly to the reversing switch on the gearbox – so I have 2 options. I suggest that I will stick to the Pioneer for the reversing camera as the image will come up on the radio screen which is bigger and has the guidelines which can be edited specifically for your vehicle.

The Pioneer camera is a ND-BC8 which is a separate purchase and costs about £70.00. It is finished slightly better overall, but the bracket seems not so strong but is supplied with a sticky. I will need to carefully drill through this in order to fix it properly.


I will cover the installation in another post.

The MOT………….

The MOT expired in early August, so I let it go as I knew the car was not going anywhere for a while!

When Perentie was in my favourite garage (Milford Motors) having his suspension upgraded, Dave was kind enough to spend some time with me looking over the car and discussing what needed to be done for the MOT.

This proved to be an interesting exercise and I can recommend it to anyone.

I now needed to finally tidy the wiring now the re-wire was complete. I had left this up until now as I just knew, the moment I bound it all up and secured it neatly, that I would need to add another wire. This was a good call as that is exactly what had happened on more than one occasion!

Similarly, some of the brake pipes needed securing as I had moved a couple in order to paint the axes and tidy up the previous, rather rusty brackets that may have caused the pipes to corrode in the future.

Dave drew my attention to the lower steering joint that was corroded and a track rod end whose rubber seal had perished. He also pointed out that the flexible clutch hose than goes from the slave on the gearbox to the main pipe leading to the master cylinder had not been secured properly (probably when the box was changed) and was in danger of chaffing.

I was also concerned about the lower (low pressure) power steering hose; that was not the correct hose; hence the leaking issue. It was swelling and in danger of giving up the ghost completely!

So it was another trip to Paul Light Land Rover for parts………….

The steering joints were only about £20 each, so I decided to replace both the upper and lower at the same time.

The ball joint is also an inexpensive part but the others were not in the best condition. Paul suggested that given the weight of the vehicle and our planned trip that I might like to consider upgrading to heavy duty steering arms and drag link from Brit Part (DA5502M). These came with the new ball joints already fitted and since they were new, re-setting the tracking would not involve a battle with seized adjusters – sold…………. He was not kidding when he said heavy duty, they are heavy!

I was not sure which clutch hose I needed due to the gearbox change, so Paul gave all three of the possibilities; to save messing around when the job was being done.

Perentie was booked in for the MOT and returned a coupe of day later…………….

The steerings joint were a pain as they were completely seized, although I had been spraying then with WD40 for a few days. I knew this was one job that I could never do myself on the drive, first because I knew it would be a pain and secondly, I have no means to re-set the tracking properly.

The clutch flexihose was not simple either. The logical place to secure the bracket was to one of the clutch slave fixings which made sense. The only problem was that the clave was actually only held on with one bolt, the second was doing nothing. So this has to be heli-coiled – another delay, but a lovely neat job done by Dave.

I had got a length of steel braided power steering hose for protection as the pipe is quite vulnerable at the front of the vehicle. I did get the right size, but it was a bit of a fight apparently, as the fittings at each end were very slightly different.

The old steering damper had to come off anyway, so this was replaced wit the Old Man Emu one that I got at the same time as the suspension parts.

That done I got my MOT ticket!

Sadly though, they replacement hose has not fixed my power steering leak completely, the steering box has a leak as well which really needs to be done. The steering has been a problem ever since we got the vehicle, see “Power Steering Woes”, I suspect a new pump will be obtained before we go away.

Other advisories were some corrosion in the drivers footwell, which was on my list to be done anyway, (the only corrosion on the entire vehicle, by the way!) and some play in the front radius arm bushes, which is not an issue right now.

When I drove Perentie after the suspension was sorted there was an amazing difference, but the upgrades to the steering has transformed it…….it now goes in the direction that you want it to go, rather than making its own mind up.

I now consider it safe for Benita to drive as it was more than a handful before – so I have promised her a trip out at there weekend along some of those bumpy undulating New Forest Roads….(que Mutley style laugh!).


Moving the main battery

The main starter battery in the Perentie is located in the usual position for a Defender – under the passenger seat.

Original starter battery

Well a very small battery for a very large car, totally the wrong specification. Still it has managed the job so far, even with, in the past, the lack of glow plugs, dodgy earths and generally bad wiring.

A larger capacity battery with a much high Cold Cranking Amp (CCA) rating was purchased a while ago and has, on occasion, been used to get the Perentie started. I resisted the temptation to fit the new battery in the existing position, as the plan had always been to change the location of the main battery.

Because of the unique chassis that the Perentie has, the main fuel tank is under the drivers seat, like a 90, rather than at the rear like a standard 110 Defender. This is because the specification was for the spare wheel to be housed under the chassis at the rear, hence the slightly longer chassis length; this also meant that the fuel tank had to be relocated.

The tank is a modest 65 litre capacity. Knowing that diesel is not as readily available in the States as in Europe, I decided early on that a second tank giving us a longer range would be a good plan.

Therefore the logical position for the second tank would be under the passenger seat (to mirror the 90 set up), so the battery just had to move……….There are a few after market long range tanks available for the 110, but these are all made specifically for the standard Land Rover chassis and would not fit the Perentie out of the box.

So where to put the starter battery……………..? The logical place was to use the side locker on the passenger side which is roughly in the centre of the vehicle. This would keep it in the dry and keep the distance to the starter to a minimum, reducing any current reduction.

Both the earth and battery cable were a bit thin and quite frankly a bit worse for wear after spending there lives in the Outback.: so I upgraded to a heavier 40mm (cross-section) cable for both.

The main cable had to be lengthened so the upgrade made sense.

Moving the battery was a job that had been put off for a while as there were other more important things to sort on the vehicle, but it needed to be done before the fuel tank could be moved.

By chance my auto electrician and now good friend Phil James was passing by last weekend and offered to give me a hand. I spend hours working alone and sometimes it is great to have someone else, especially someone with experience to talk things through with. As a result, my cable runs were slightly different and we came up with a good position for my new battery isolator and my jump terminals.

Phil is a mobile auto-electrician specialising in Classic and American cars and roams the South of England in his motor home sorting peoples classics. Phil parks the Motor Home on our drive and after work, Benita cooks a splendid meal and we annoy the neighbours by playing guitar late into the night. Cars and guitars, what could be better!

So I had pre-ordered most of the parts that I needed, this included splashing out on a proper crimping tool for the battery terminals. This was worth every penny, as I knew that after this job, I would have a few more terminals to fit when I connected up the leisure batteries. The crimper gave us beautiful hexagonal crimps which were not going anywhere, Phil, of course , insisted that we solder them in as well just to be sure! – if a job is worth doing……….

I gave the inside of the side locker a coat of Buzz Weld chassis paint to keep any rusting at bay and lined the bottom with some chequer plate with a layer of neoprene between that and the floor of the locker. Hole were drilled to bring the new cable up into the locker and filed down so that there were no sharp edges, grommets were fitted and just to be sure, the cable had some conduit fitted for added protection.

I had found some battery jump posts on the Car Builder Solution web site and wanted to fit these to provide a remote charging and jump start option. This would mean that I would not have to open the side locker to reveal the position of my battery to anyone that might want to make off with it!

After looking at a number of options, Phil and I decided to drill through the right hand wall of the side locker, so that the posts would be available, but hidden in the the rear wheel arch.

Jump posts in the rear wheel arch


We left some slack in the new main cable to the starter so that I could bring the cable into the passenger compartment later on, to connect up to the isolator which would be near to the gearbox tunnel on the passenger side. We did not do it now as the seat box will have to come out when the second fuel tank is fitted. (another excuse to use my crimping tool).

I fitted a couple of anchor plates to retain the battery and a strap from Webbing Buckles Straps Ltd and connected it all up, a couple of “P”clips to keep everything tidy and job done.

New battery fitted in new position.

Oh and finally, because we were using aluminium chequer plate and the locker was steel, Phil suggested using nylon fixing to avoid corrosion in the future – attention to detail is important!

Nylon Bolts

The Alu-Cab 270 degree shadow awning and fitting.

The All-Cab shadow awning attaches to the side of the vehicle and easily pulls out and around the back of the car – providing shade to the side and over the rear door.

Library Picture

Benita and I had always planned to get one of these, to the point that I had a conversation with Tuff-Trek last year about fitting it to the Perentie. I had a front roof rack and there was a question about whether it would foul the front support which sits in the gutter. I had a very helpful conversation with Dara King who in conjunction with their fitter, was sure it would work.

I thought no more about it for a while and then lock down happened. I then get an e-mail from Tuff-Trek to see if I was still interested. Well, I was, sort of – maybe – if I could do a deal……………

Well I did get a small discount and a free set of LED lights, but the upshot of my conversation with Dara was that once the current batch of Shadow Awnings were gone then who knows when the next ones will be available. They are manufactured in South Africa and they had been shut down since March – substantial price rises over the range were also in the pipeline – so I bought one, along with the roof bars; more on them later.

I had already decided to remove the front roof rack for repair and paint as it was rusting badly, so I did it now to make it easier to fit the awning. I could always amend the fitment of the roof rack later if needed.

Although we probably will not use the Awning camping this season, I figured that it would start paying for itself by providing me with shade when working outside in the Summer and shelter from rain in the Winter (in the Summer as well as it turns out!)

The awning arrived very quickly so I decided to get on with fitting it straightaway. There were no instructions in the box but a search on the Alu-Cab website turned up some very basic drawings of how the whole thing fitted. You Tube can be your friend in these cases, but all I could find was a guy trying to fit one to Toyota and having all sorts of problems – Great!

I have learned the lesson now, to sit and look and think, and think a little more before starting a job like this – nothing worse than drilling a hole in your All-Cab roof – in the wrong place.

So first job was to fit the rear bracket on the corner to the left of the rear door (as my awning goes on the passenger side) – this entails removing the trim on the inside on the Alu-Cab roof – but by chance I had already done this to run some cables. The bracket can really only go in one place so it is easy to mark the holes using the bracket as a template and to fit the strengthener plates on the inside. I had already put the trim back on when I took the picture, so you can only see one.

So, next you have to fix the second bracket to the awning itself. Then provisionally attach the awning to the rear bracket on the vehicle, so you can mark the position for the second bracket on the roof. Easier said than done as it weighs 28kg!

So this is where it gets interesting. You need to feed a bolt through awning backplate to fit the second bracket which you can just do – but they supply a pan head stainless steel bolt, so you can’t get on it, to tighten it. Turning to the rear, again you have to feed a bolt through the awning itself in order to secure it to the roof. However, you cannot feed a bolt through there either because the main struts for the awning are in the way. See below.

So, the only way forward is to unbolt the main struts, feed the bolt in and then put it back together again. Not before a trip to the local nut and bolt seller to get proper hex head bolts that you can get a spanner one them.

I wish I had a video of the next bit. I managed to lift the awning onto the rear bracket on the car and get a bolt in to hold it in place whilst my Dad held up the other end – I was a hot day and we did struggle. With the rear bolt in place, I helped Dad support the other end of the awning whilst marking the bolt positions on the roof of the car. I then had to remove the rear bolt so we could get the awning down.

My plan was to actually drill one hole only for the second bracket to start with, I was sure that if did them all at the same time that they would not line up – no matter how careful I was. Then with the awning in position secured with one bolt in each end, I would use the strengthener plate for the second bracket, to drill the other three holes from the inside – then they would be in exactly the right position.

So the plan was put into action, with the rear of the awning provisionally in place again, we set about trying to get the bolt through the second hole that I had drilled – virtually impossible to do from the outside when holding the awning and trying to see where to hole was…………….SO, we enlisted the help of Benita who sat inside the car and whilst we juggled the awning into position. When eventually everything lined up Benita pushed the bolt through from the inside. Once tightened up to get the position dead right, I drilled the other three holes, bolted it up and then reversed the bolt that was the wrong way around.

You have to remember to pass the rear bolts through the awning cover, it is too easy to miss this to start with as the cover folds back when you are working – missed this the first time we offered it up. You can also see the strengthener plate and the bolts from the inside.

You can see that I cut the interior trim panel, so that I can access the bolts , if necessary in the future. Once the internal cupboards are refitted, it would be very time consuming to remove.

Overall, a job well done and excellent teamwork.

And Yes, it does exactly what All-Cab claim, one person can set it up in a couple of minutes and it take just a little longer to put it away.

I will post a picture once it stops raining………..

Suspension Upgrade – a few notes

The Perentie has always “wandered” a bit on the road and this can be quite scary at times, especially on some of the local Forest Roads which have strange cambers. The extra weight of the Alu-Cab Roof and front roof rack don’t help matters either.

Part of the problem was the wheel tyre combo which has now been sorted, but I always planned to upgrade the Suspension.

As you know, the Perentie has a unique heavy duty chassis with a 2 inch lift, but Suspension parts are basically Land Rover. Ultimately the vehicle will be quite heavy as we add Overland kit, so I wanted the upgrade to be sufficient for this.

With lots of aftermarket choices, I started my research and soon found that many suppliers would not make recommendations for the Perentie. A number of people on the Australian Perentie Owners forum use components for a 130 Land Rover which makes sense, but another popular upgrade is to Old Man Emu parts, not surprisingly – made in Australia – well they know what they are doing out there! If it breaks in the bush, then you have a real problem.

The importer for Old Man Emu in the UK is Arbil Ltd and they list dozens of different suspension components, including coil packers and castor angle correctors. So one evening I sent them a e-mail asking for advice and not necessarily expecting a reply……..

Oh ye of little faith, I soon get a reply from Simon Picken asking me to give him a call. Simon was extremely helpful and understood exactly what a Perentie is and provides me with a list of parts, together with guide prices – all I have to do is select my supplier.

Britpart sell some Old Man Emu parts but they assign them their own part numbers, so I pay yet another visit to Paul Light Land Rovers. I give Paul the OME parts numbers and he cross references these with Britpart. The following Monday I have these on my driveway!

Lovely – Shiney new Suspension!

Paul is busy getting back to normal after the lockdown, so I ask Darren and Dave at Milford Motors to fit these for me as I don’t fancy attempting this job on my front drive. I clean everything down soak all of the bolts with silicon to make the job easier and get new turrets and top plates for the front as these were looking a bit worse for wear.

I drop the car in and the soon get a call saying the job is going well, followed but the usual “BUT” – one of the top bushes for the rear shock absorber is missing! This is a singe part which is pressed in, rather than the two part bush – I call in at Paul Lights and pick-up a standard Land Rover bush which is too big! Britpart do not list the bush kit separately (which is a learn for the future), so Paul simply orders a new Shock Absorber, which arrives the next day and hands me the bush from the box – result. Incidentally, in the box is a bag with the bottom bushes and the washers etc, the missing part was floating around separately, so someone on the packing line is Oz must have been looking forward to there Fosters a bit too much!

The replacement bush – smaller than the Land Rover part.

The car is soon ready and I take the opportunity to look over it on the ramp with Dave, as the MOT is due soon – more of that later.

The Perentie now stands even Taller with the rear cross member over 2 ft from the ground, more importantly it drives brilliantly – no wallowing…….

I wire brushed and painted the rusty rear axle which improved the look of the car from the rear – will do the rear hubs at some point, but may upgrade the disc brakes – we will see.

Improving the look – New Hinges

The Perentie is beginning to look a little better cosmetically, although there is a long way to go.

After a Winter on the driveway, rust from some of the fixings and from the hinges themselves was beginning to make them look very shabby. Also, the grey paint job done by the importers was not great and was in places failing to bond with the Military “Olive Drab” paint underneath.

Old Door Hinges

Although I have no image, the bonnet hinges were as bad, so I decided to change both.

Rather than deal with the rust issue again in the future, aluminium was the way forward and there are a couple of aftermarket options. For the door hinges I went for the Optimill, not cheap but beautifully made, they come with stainless steel security bolts which I wanted, in any case.

Whilst Optimill do bonnet hinges with the same fixings, I found another German made product which screws in from under the bonnet, No temptation then, for a thief.

All sourced from Defender Upgrades.

New Hinges – Look – no fixings!

The bonnet hinges are relatively easy to fit; if you had someone to hold the bonnet it would be easier! I took the opportunity to repaint the area around the hinge which was looking a bit ropey.

Next a look at the door hinges……..the existing fixings were a mixture of hex, phillips and torx heads. Someone had fitted Puma doors to the Perentie, this coupled with the fact that you can get to the nut on the back of the bolt quite easily made these easy to loosen.

The bolts on the A Post/Bulkhead though, I suspected were going to be a challenge, none of them had any give at all and you cannot get to the nut on the back as they are captive. I guessed that drilling them out would be the solution and because most of my larger bits were getting a bit blunt, I decided to get some more before stating the job, rather than make it harder work than necessary. I had had some Snap On drill bits for many years and decided to treat my self on some replacements – expensive, but they don’t snap. In the meantime I soaked the fixings with silicon spray.

The Snap On bits did not show and a call to them promised a delivery in October!, so order cancelled and a less expensive alternative purchased.

The delay allowed for a few more soakings of silicon and one last try before resorting to the drill. All 8 bolts yield with a little persuasion – result! – Sometimes time and patience works.

As the hinges were coming off, it was a good time to replace the mirror arms which were again, shabby and an inexpensive Britpart product was fitted. Note stainless steel and copperease, in case it is me removing them in the future..

Fixing the new mirror arms

I removed the hinges one by one and painted around the area where they were fitted, to smarten the job up a bit. I also made sure that the new bolts travelled easily through the captive nuts to avoid problems during the actual fitment – again – plenty of copper ease.

The job proceed really well (for once), at least until I got to the last bolt on the bulkhead for the last hing. It would not pull up tight – just spun around – typical as I had been so careful. I heard a small thud as I undid the hinge as the captive nut became free and dropped somewhere in the depths of the vehicle – never to be seen again. The cage that contained the nut had rusted through and had failed.

So off to Paul Light Land Rover for another – they were in stock and only pennies, so I bought three – what a pessimist!

Now these things are a pain to fit, very fiddly, one slip and the whole thing disappears to lie forever with the other nut that disappeared. The spring is very strong, so I devised a method of using a carpenters pencil to stop the whole thing disappearing in the vehicle and a rivet to hold the top in a place where I could get a angle to tap it into place – genius…….

On re-fitting the hinge, I struggled to do up the bolt in the new captive bolt. You cannot really see what is going on so I eased off to see to take a look, then that thud again – my new captive nut had escaped!

On investigation, the small tags that hold the nut in place had bent and released it from its home. So I made sure that the nut was nice and tight on the next fitting by clamping it tight in a vice. I also did what I omitted to do first time around and tried running the bolt through the nut. Guess what a couple of turns and then it stuck tight.

There is a reason why these things only cost pennies, they are poor quality Chinese, I am sad to say – we come across this more often now with Land Rover parts. As I still had spares, and I don’t have a tap and die set – I decided to use a spare bolt with the correct thread to run the thread through the nut – they are not full thickness nuts so this was quiet easy. After installing the second captive nut all went together easily.

All looks very smart now with the new wide angle mirrors. The security fittings might put off an opportunist thief.

Fitting new Wheel Arches

With the new wheels fitted and an MOT looming the old standard wheel arches were no longer providing sufficient coverage for the wider rubber.

Original wheel Arches

There are a number of after market options available and I needed a 2 inch wider product as a minimum. There is a James Bond Spectre option which frankly, was a little too much……so I went for the Britpart Off Road option DA2366, these screw on rather than using the flimsy plastic trim fixings and I could get them from Paul Light Land Rovers, thus saving the carriage.

When they arrived, I had thought that they might not fit around the rear arches because of the lockers – I grabbed one out of the box and offered it up – it seemed just about OK, so I thought no more about it.

A week or so later I got around to fitting the arches – the fronts and the rears are different (obviously!), but I had offered a front arch up at the rear. Anyway, I got on with fitting the fronts. The Perentie wheel arches are not quite “true” so it took a while to get them in place so that they looked symmetrical. Britpart supply self tapping screws and covers but these pull through the arch too easily so I replaced them with stainless steel pan head bolts with washers – these look better as well.

The other issue was that the original front arches extend further into the arch than the Britpart ones and cover the gap at the back of the the inner arch which prevents mud getting into the engine bay.

Old Wheelarch

The solution is to cut the outer section off (the bit above the holes) and to use the existing holes in the original arch and car wheel arch to fit the inner section back to the vehicle.

So onto the rears…………..I tried all ways to get them to fit and look good without blocking the locker doors, but it was not happening. I considered altering the locker doors, but in the end it was easier (and less expensive) to buy another full set of wheel arches and use the fronts on the back. The spare rears will go on e-bay and I will get my (most!) of my money back.

So overall, a good job done and the Perentie looking cooler!

New wheel arches fitted.
One Chance to See the World

Insta @onechancetoseetheworld